MAKCU setup
This page follows the official MAKCU setup guide and adds what SkyAim Pro needs from the board: it opens the MAKCU's own COM port at 4M baud, so the MAKCU Toolkit must step aside (Direct mode) while SkyAim Pro runs.
Everything below is based on makcu.com/en/setup, information, the MAKCU Toolkit guide and troubleshooting. Pictures are from the Toolkit guide.
Requirements#
| Requirement | Why |
|---|---|
| CH343 driver on the radar PC | USB2 shows up as a COM port only with the CH343 USB-to-serial driver installed. |
| COM port number below 10 | COM10 and higher cause connection problems; change it in Device Manager if needed. |
| Baud rate 4M | MAKCU V4 runs at 4,000,000 baud by default and SkyAim Pro talks to it at that rate. Do not switch the board to 115200. |
| Both chips flashed | The USB1 chip (to the game PC) and the USB3 chip (mouse side) must both run current MAKCU firmware. |
| Supported mouse on USB3 | A standard USB mouse or its wireless receiver. Check the verified list on makcu.com. |
1. Install the CH343 driver#
On the radar PC, download the CH343 driver from makcu.com → Downloads, run the installer and follow the wizard. Without it the MAKCU never appears as a COM port.
2. Plug in the three ports (normal mode)#
| Port | Goes to | Note |
|---|---|---|
| USB1 | Game PC | The game PC sees the MAKCU as the mouse that is plugged into USB3. Manufacturer software (DPI, lighting) still works through it. |
| USB2 | Radar PC running SkyAim Pro | The management / COM port (CH343). Only one program can open it at a time. |
| USB3 | Mouse or its receiver | MAKCU powers it. A mouse with bright lighting can exceed the power limit and drop out. |
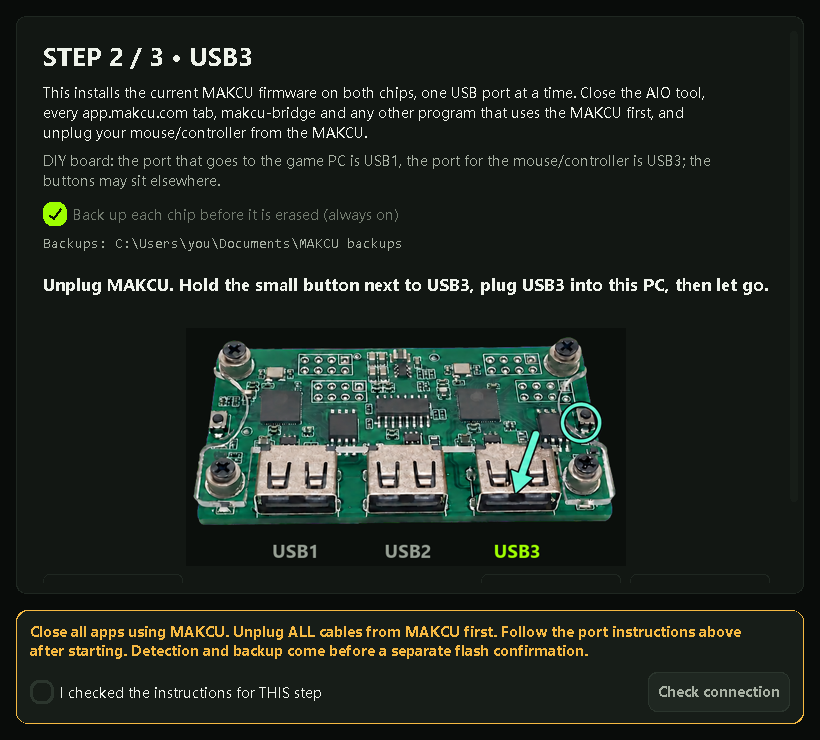
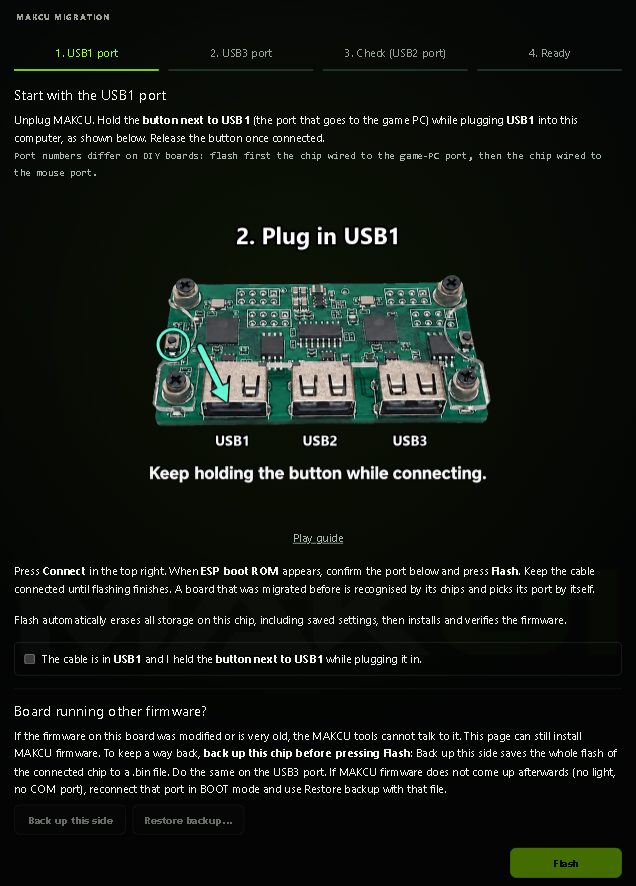
Holding the small button next to USB1 or USB3 while connecting that cable puts the chip into flash mode: it then shows up on the PC as a flashing target, not as a MAKCU, and your mouse does nothing. Flash mode is only for firmware updates, one cable at a time.
3. Update the firmware with MAKCU Toolkit#
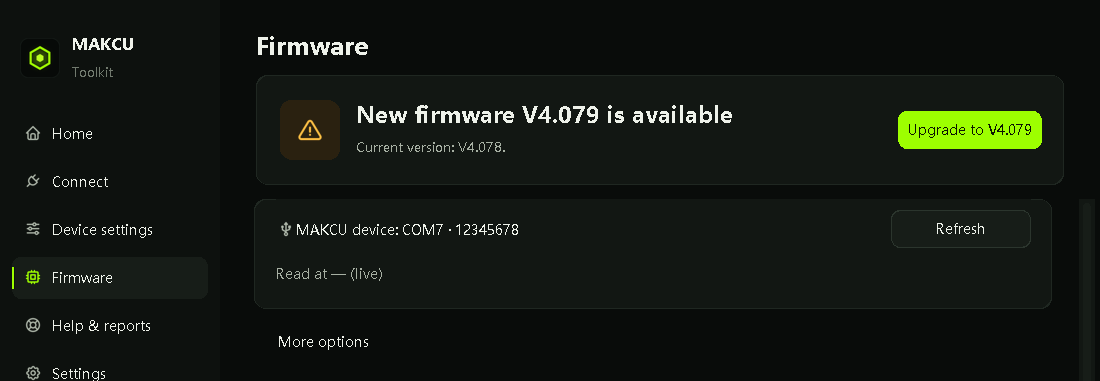
Install MAKCU Toolkit on the radar PC. It reads the board's firmware version and installs the current one; most connection problems disappear after an update.
- Check Home
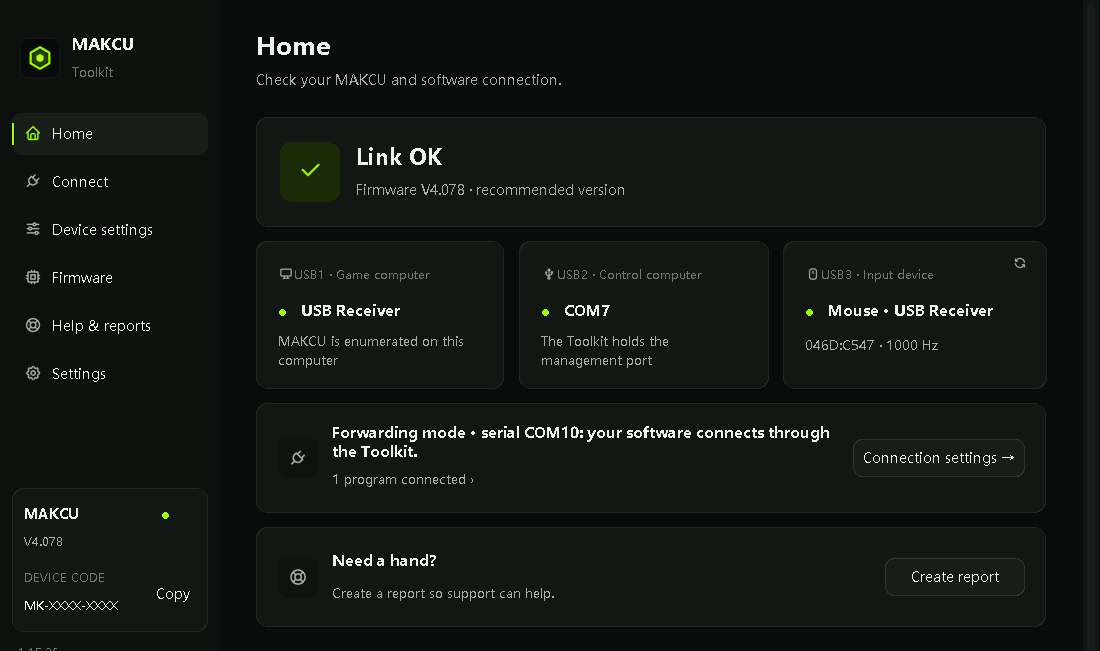
With USB1 and USB2 plugged in (no button held), the Toolkit's Home page shows Link OK, the firmware version and the three ports. A yellow card means a newer firmware is available.
- Firmware → Update
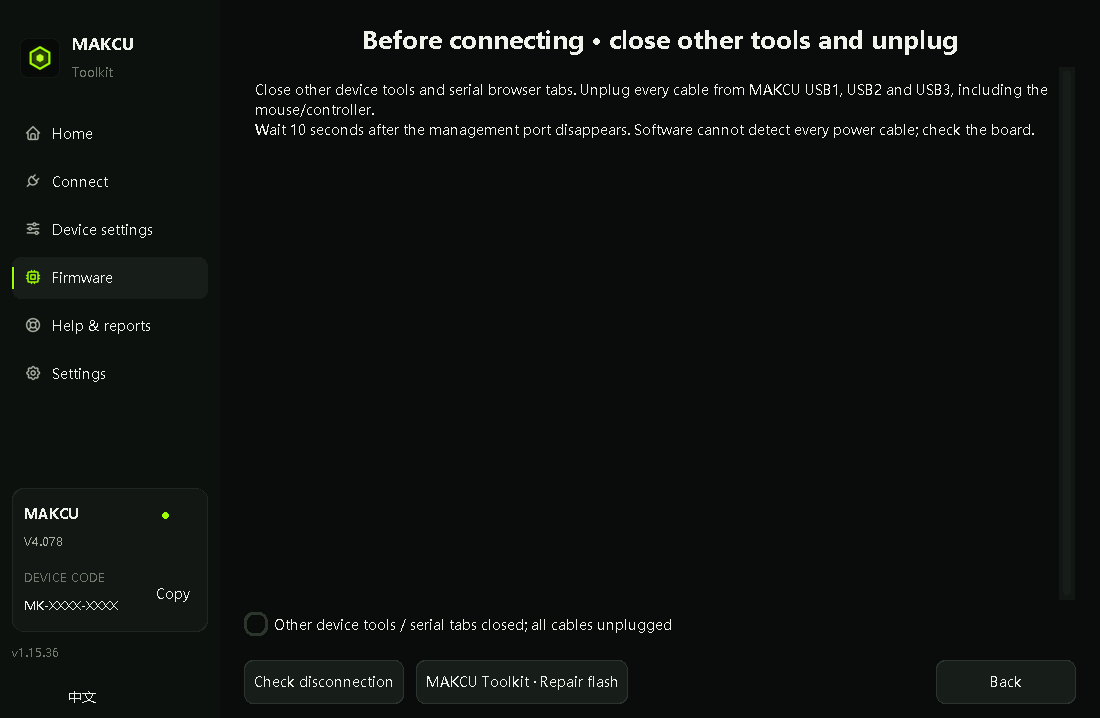
Open Firmware and press Upgrade. Follow the screen: unplug everything, plug in USB1 then USB2 with USB3 empty, Check device, then Start update. Do not unplug anything while it runs.
- Old V3 or unknown firmware
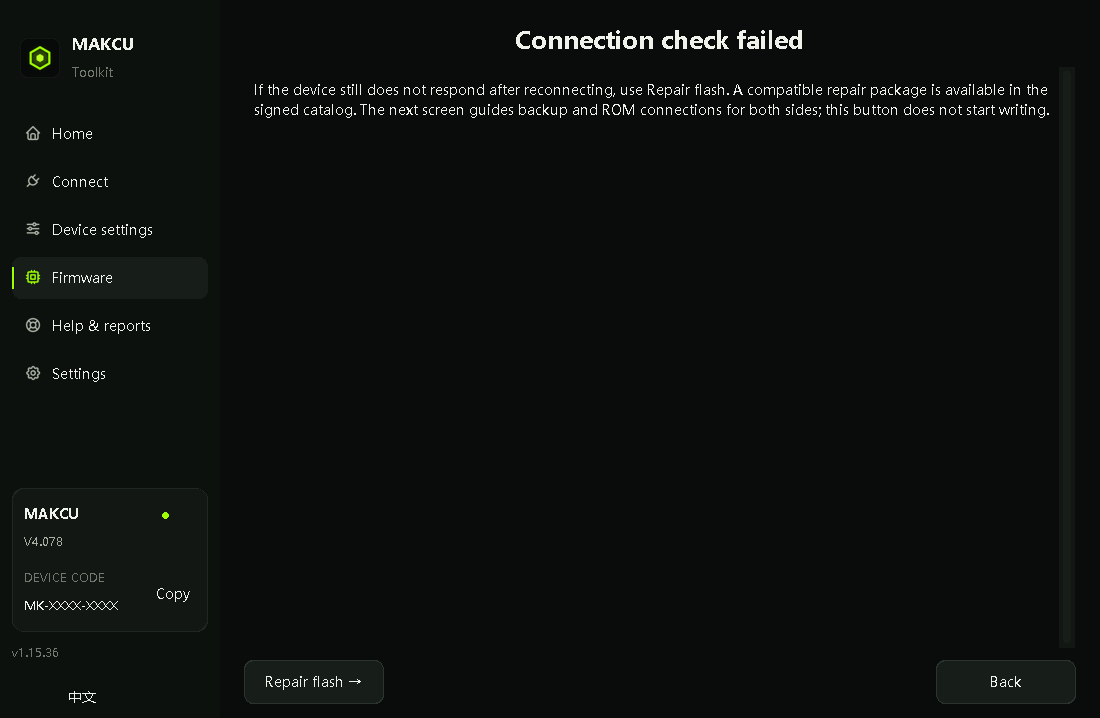
If the Toolkit says old V3.x firmware or the connection check fails, use Repair flash on the Firmware page: it flashes each chip separately. For every step the tool shows which button to hold (next to USB1, then next to USB3) and which cable to plug in. If Repair flash is not possible, the migration page app.makcu.com/makcu does the same in Chrome or Edge, USB1 first, then USB3.

4. Set the Toolkit to Direct mode#
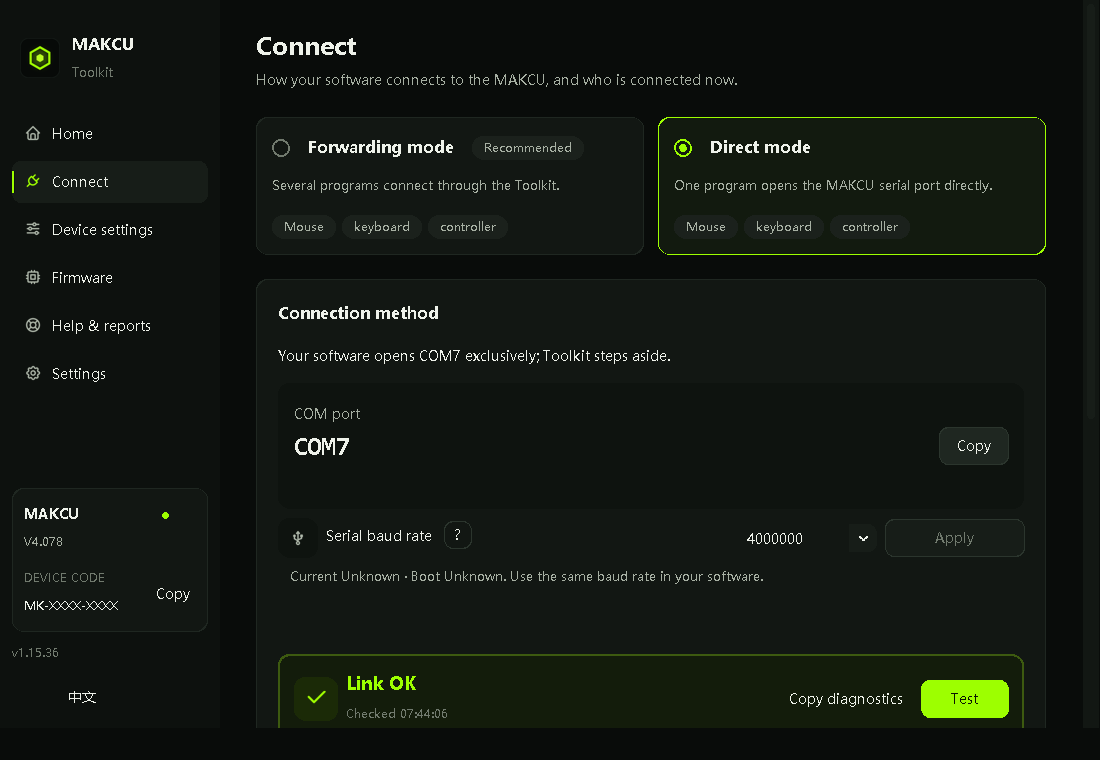
This is the step that is specific to SkyAim Pro. In the Toolkit's default Forwarding mode, the Toolkit itself holds the MAKCU's COM port and offers your software a virtual port instead. SkyAim Pro opens the physical CH343 port directly, so in Forwarding mode it cannot connect and reports Failed to open Makcu serial port.
- Connect → Direct mode
Open Connect in the Toolkit and choose Direct mode. The page shows the physical COM port (for example COM7) and the serial baud rate 4000000; that is the port SkyAim Pro uses. The choice is remembered.
- Or quit the Toolkit
Closing the Toolkit window does not quit it; it keeps running next to the clock. Right-click the MAKCU tray icon and choose Quit Toolkit if you prefer to run SkyAim Pro without it.
- One program at a time
Only one program can own USB2. Close SkyAim Pro before using the Toolkit, the migration page or any other MAKCU tool, and close those before starting SkyAim Pro.

5. Find the COM port#
On the radar PC: right-click Start → Device Manager → Ports (COM & LPT) → USB-Enhanced-SERIAL CH343. Note the number. If it is COM10 or higher, right-click it → Properties → Port Settings → Advanced → COM Port Number and pick a free number below 10. Do not change the baud rate in Windows; it has no effect on the MAKCU. Device Manager pictures are on the KMBOX Bpro / MAKCU serial page.
6. Connect in SkyAim Pro#
- Aimbot section → Device
Ctrl 6. SkyAim Pro pre-selects the MAKCU when it finds the CH343 adapter; if several adapters exist, pick the COM number you noted.
- Connect
Click Connect. SkyAim Pro opens the port at 4M baud, asks the board for its version and the Firmware line shows
km.MAKCU; the console prints Makcu connected and verified.
LED status#
| LED | USB1 chip LED | USB3 chip LED | Action |
|---|---|---|---|
| Solid on | Game PC connected | Mouse connected | Working, nothing to do |
| Solid off | No device | No device | Connect the cable or the mouse |
| Slow blink | Warning / adjusting | Warning / temporary | Wait 10 seconds, or unplug all cables for 10 seconds and reconnect |
If it does not connect#
| Symptom | Cause | Fix |
|---|---|---|
| Makcu device not found via VID/PID or friendly name | USB2 is not on the radar PC, or the CH343 driver is missing. | Check the cable goes to USB2 and to the radar PC; install the CH343 driver; look for the CH343 entry in Device Manager. |
| Failed to open Makcu serial port | Another program holds USB2: the Toolkit in Forwarding mode, the AIO tool, a browser tab on app.makcu.com. | Toolkit → Connect → Direct mode (or quit it from the tray); close the other tools; connect again. |
| Device did not return expected signature (km.MAKCU) | The board was switched to 115200 baud, runs old V3 firmware, or the wrong COM port is selected. | Hold the button on the USB1 side for about one second: the USB1 LED flashes 4 times when it switches back to 4M (1 flash means 115200; hold again). Update with the Toolkit. Check the COM number. |
| Device Manager shows USB1 or USB3 connecting and disconnecting | That chip has no firmware (factory state) or damaged firmware. | Repair flash in the Toolkit or the migration page: hold the button next to that port while plugging it in, USB1 first, then USB3. |
| Connected, but Mouse test moves nothing | USB1 is not on the game PC, or the mouse is not on USB3. | Fix the cabling as in the diagram; the USB1 and USB3 LEDs must both be solid on. |
| Mouse keeps dropping out or its lights stay off | It draws more power than USB3 allows. | Try another mouse or turn its lighting off. |
| Stutter or stuck buttons after a while | Mouse set to 2000 Hz or higher; MAKCU passes 1000 Hz at most. | Set the mouse to 1000 Hz in its own software. |
Verify and calibrate in SkyAim Pro#
- Mouse test
In the Aimbot section click Mouse test. The cursor on the game PC draws a small square. Nothing else works until this does.
- Connect on startup
Tick it so the device is opened every time SkyAim Pro starts.
- Calibration (this PC)
Run it once after the first successful Mouse test, and again after you change mouse DPI or in-game sensitivity (unless Use the game's sensitivity settings is on). It is stored per PC, not per profile. Until you do, the status reads Not calibrated: using the default gains.
- Aim button
The MAKCU reports its own button presses, so the Aim button (Mouse 4 or Mouse 5 are the usual) is detected even though the mouse is physically on the game PC. Keyboard hotkeys (Toggle aimbot, Engage aimbot) are optional extras.
Now tune the aim itself: Device aimbot reference.
Check the FAQ and the launcher message list first. If that does not solve it, send the publisher your newest file from output\Logs (or launcher-update.log for launcher problems).